Lesson 11: Saving Your Presentation
In this lesson, we’ll be learning about the different formats in which we can save our presentations.
Objectives:
- To demonstrate how to save our PowerPoint presentations
- To enumerate the different formats in which we can save our PowerPoint presentations
- To enumerate the advantages and disadvantages of the different formats
Quick Navigation through the Lesson 3:
Saving our presentations is just as important as the presentations themselves—the way we save our presentations determines whether or not they can be edited and moreover, limit how they can be viewed. When choosing how you want to save your presentations, you must take into consideration what you want to use the presentation for. Is it mean to be read? Is it meant to be an overview or guide for your actual presentation? You can also save one presentation in different formats—you can save one copy as a .pdf and another as a slideshow. We’ll be outlining each of these formats, how to save your presentation and how you can make the most of these available file types.
Before we begin, we need to stress that you should always save your file as a PowerPoint Presentation (.ppt) first so that in case you lose your final files, you will always have this edit-able file for back up. To do this, you should click Save As at the beginning of your presentation and subsequently press Save every few minutes to avoid lost data. As we discussed in earlier lessons, the Save As button can be accessed through the Office Button whereas the Save button is located on the leftmost portion of the Quick Access toolbar.
As a PowerPoint Presentation (.ppt)
As we mentioned above, it is the most practical to save a copy of your slideshow in this format. This format allows you to open the file for editing—this is the main advantage of this format. However, in instances when you’re presenting and don’t want to pre-empt the slideshow for your audience, this might not be the best format to choose because your guides and notes are visible in this version.
As a PowerPoint Show (.ppsx)
This format is non-editable. This is why it’s important to save your PowerPoint as a presentation also—if you only save it in this format and you realize something has to be corrected, there won’t be a way for you to correct it otherwise.
The main feature of this format is that it allows your presentation open in the Slideshow view automatically. In a sense, it is the PowerPoint counterpart to saving a file as a movie—it showcases the final product. All of your words, images, videos, sounds and animations will be saved and rendered into an auto-play file.
This is ideal for when you have to present your slideshow because it gets the audience right to the heart of the matter without having to open the PowerPoint Presentation first.
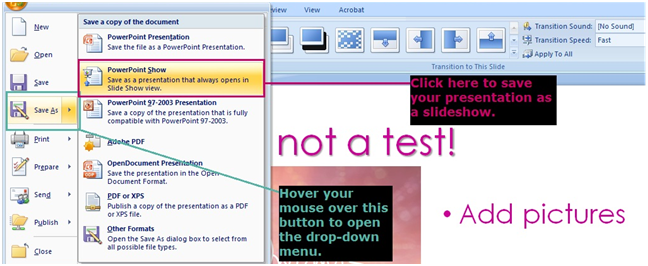
To save in this format, click the Office Button and hover the mouse over the Save As button. This opens a drop down menu which shows you the different kinds of formats you can use for your slideshow. Select PowerPoint Show. Once chosen a location for your slideshow and entered a filename for it, click the Save button in the dialogue box. This will create a copy of your presentation in Slideshow format.

As a PDF (.pdf)
A PDF is a digital readable file which renders your PowerPoint presentation as a read-only file (this format is used by some e-book readers and tablets). This is ideal for when you want to review someone else’s presentation or when you’re handing out a guide to the slideshow you’re presenting. This format is easy to print and easy to read.
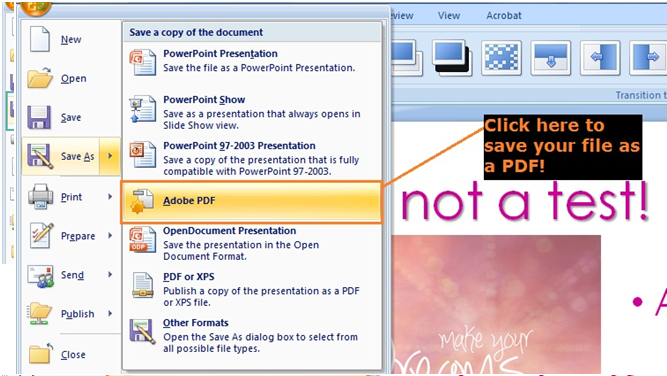
To save a copy of your document in this format, click on Save As and from there, select Adobe PDF. Like the slideshow format, PDFs are also non-editable. However, saving it in this format allows the person reading your document to leave comments on the PDF file. This is helpful for when you need feedback or you and your audience are exchanging ideas.

As Images
This is ideal for when you’re using PowerPoint to layout documents or when you’re using PowerPoint to compress large image files. Like the other formats, saving your presentation as an image doesn’t allow you to go back and edit the rendered image file. There are a variety of image files you can choose from—among these, the most common are JPEG, PNG, TIFF and GIF. Of all of these files, JPEG is the one which takes up the smallest memory and TIFF is the one which takes up the largest space; however, it is also the most high-resolution of the formats and is ideal for when you’re working on big images.

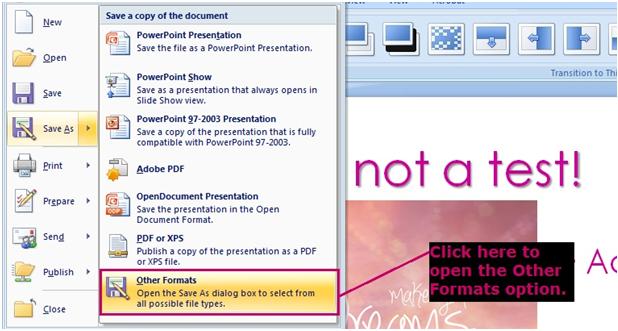
To save your document in this format, click on Other Formats in the Save As drop down menu.

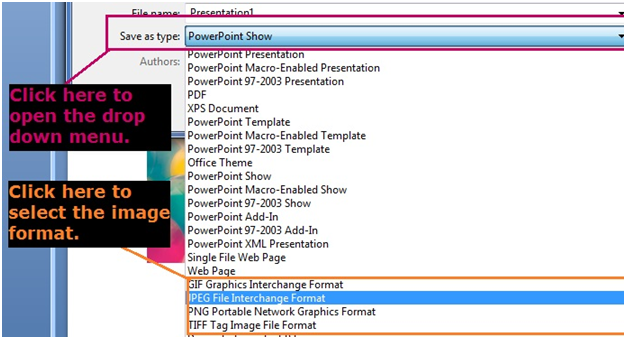
Once the Other Formats dialogue box opens, click the Save As Type bar to open a dropdown menu which reveals the different types of files you can save your presentation as. Scroll down and choose which kind of image file you would like your images to be in. Consider the space and resolution when doing this.
In this lesson, we were able to discuss the different kinds of formats in which we can save our presentations. We discussed the different occasions on which we might be able to use these different formats. We also took up exactly how we can save these different file types using PowerPoint.
Try Our Exercise And and Prep Yourself for the Real Thing
Next we’ll be discussing how to print our presentations and the different uses which printing a slideshow might have. We’ll be talking about the different formats in which one can print a PowerPoint file and how to access these in the PowerPoint window.

 + 1-888-827-0150
 + 44-20-3006-2750


