Lesson 4: The PowerPoint Window Toolbars
In this lesson, we’ll be looking at the different PowerPoint toolbars.
Objectives:
- To identify the different PowerPoint toolbars
- To discuss the different toolbars and their corresponding functions
Quick Navigation through the Lesson 4:
In this lesson, we’ll be looking at the different available toolbars in Microsoft PowerPoint for Windows 7. Toolbars are important because they serve as our guides to the functions which involve the software in general—meaning they allow us to open files, save our presentations and look at our recent files. They also allow us to physically export our slides by printing our presentation. In this part of our class we’ll be looking at the four main toolbars which are very useful for our slideshows and are essential to our mastery of Microsoft PowerPoint.
The Office Button
The Office Button is the button which controls all the software’s main functions such as opening files, saving files and viewing recent files.
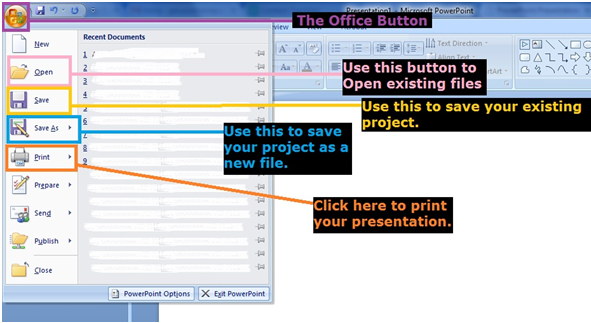
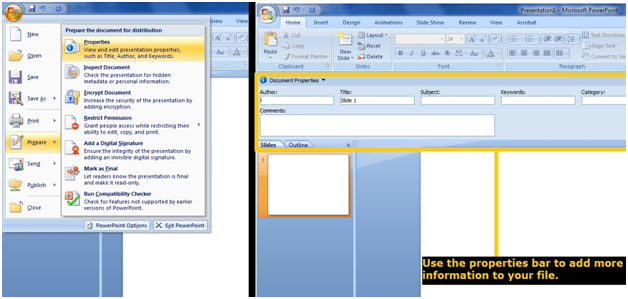
Furthermore, it contains the Properties tab which allows you to edit your presentation’s author, title and date created. You can also add comments which will come in handy if you need to send the presentation to someone. This allows you to add more information to your presentation so that it is easier for your audience to view and to understand. You can also add keywords to your file so that should you misplace or forget the name it’s saved under in your computer, it’ll be easy to look for using Windows search.
The Quick Access Toolbar
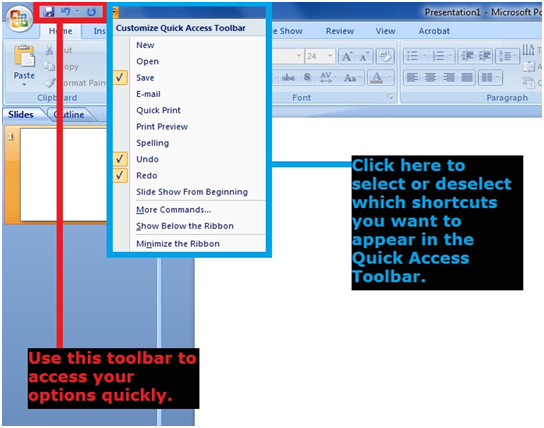
The Quick Access Toolbar allows you to immediately perform actions you would normally have to go to other menus to access. We can think of this as the “shortcut” bar. It’s located right beside the Office Button. The default shortcuts which the bar contains are the Save, Redo and Undo buttons. However, you can click the small arrow at the end of the toolbar and customize the tools you would like to have on-hand.
Drawing Tools (Images)
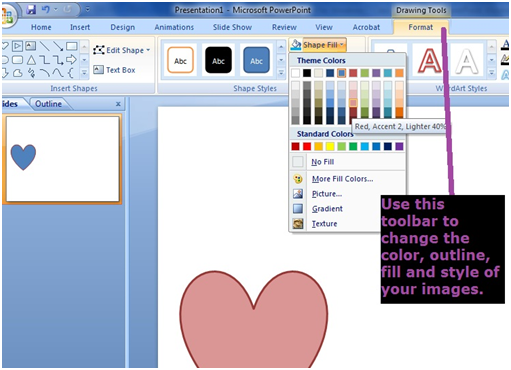
The Drawing Tools for Images only appears when you’ve selected an image (whether it be a picture, Clip Art or a basic shape). It allows you to change the colors of your image’s fill and outline. It also allows you apply certain styles to the images: with this toolbar you can also rotate your images and make them bigger or smaller, depending on your preference.
Drawing Tools (Text)
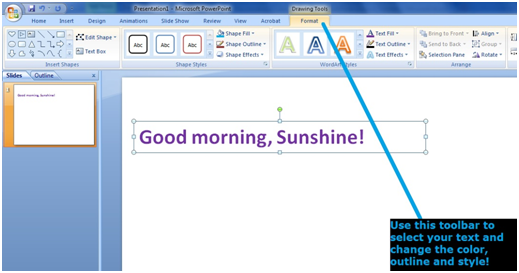
Although identical to the Drawing Tools bar for images, the Drawing Tools for Text only appears when you’ve selected a body of text. Likewise, we can use this to change the color (both outline and fill) and style of our bodies of text. By selecting the textbox as a whole, we’re able to save time and edit our text faster.
In this lesson, we were able to tackle the four main toolbars which we encounter while using Microsoft PowerPoint. We learned that using toolbars make it easier for us to access important functions like opening, saving and printing. Furthermore, we’re able to enhance and organize our presentations by perfecting the style of our text and images as well as making sure that our files have all of the information that our audience needs.
Try Our Exercise And and Prep Yourself for the Real Thing
Next up we’ll be taking a look at our Guides in PowerPoint—the Outline Tab and the Notes feature. We’ll be discussing why these aspects of PowerPoint are important, how to use them and how they can make our presentations easier to make and understand.
 + 1-888-827-0150
 + 44-20-3006-2750


